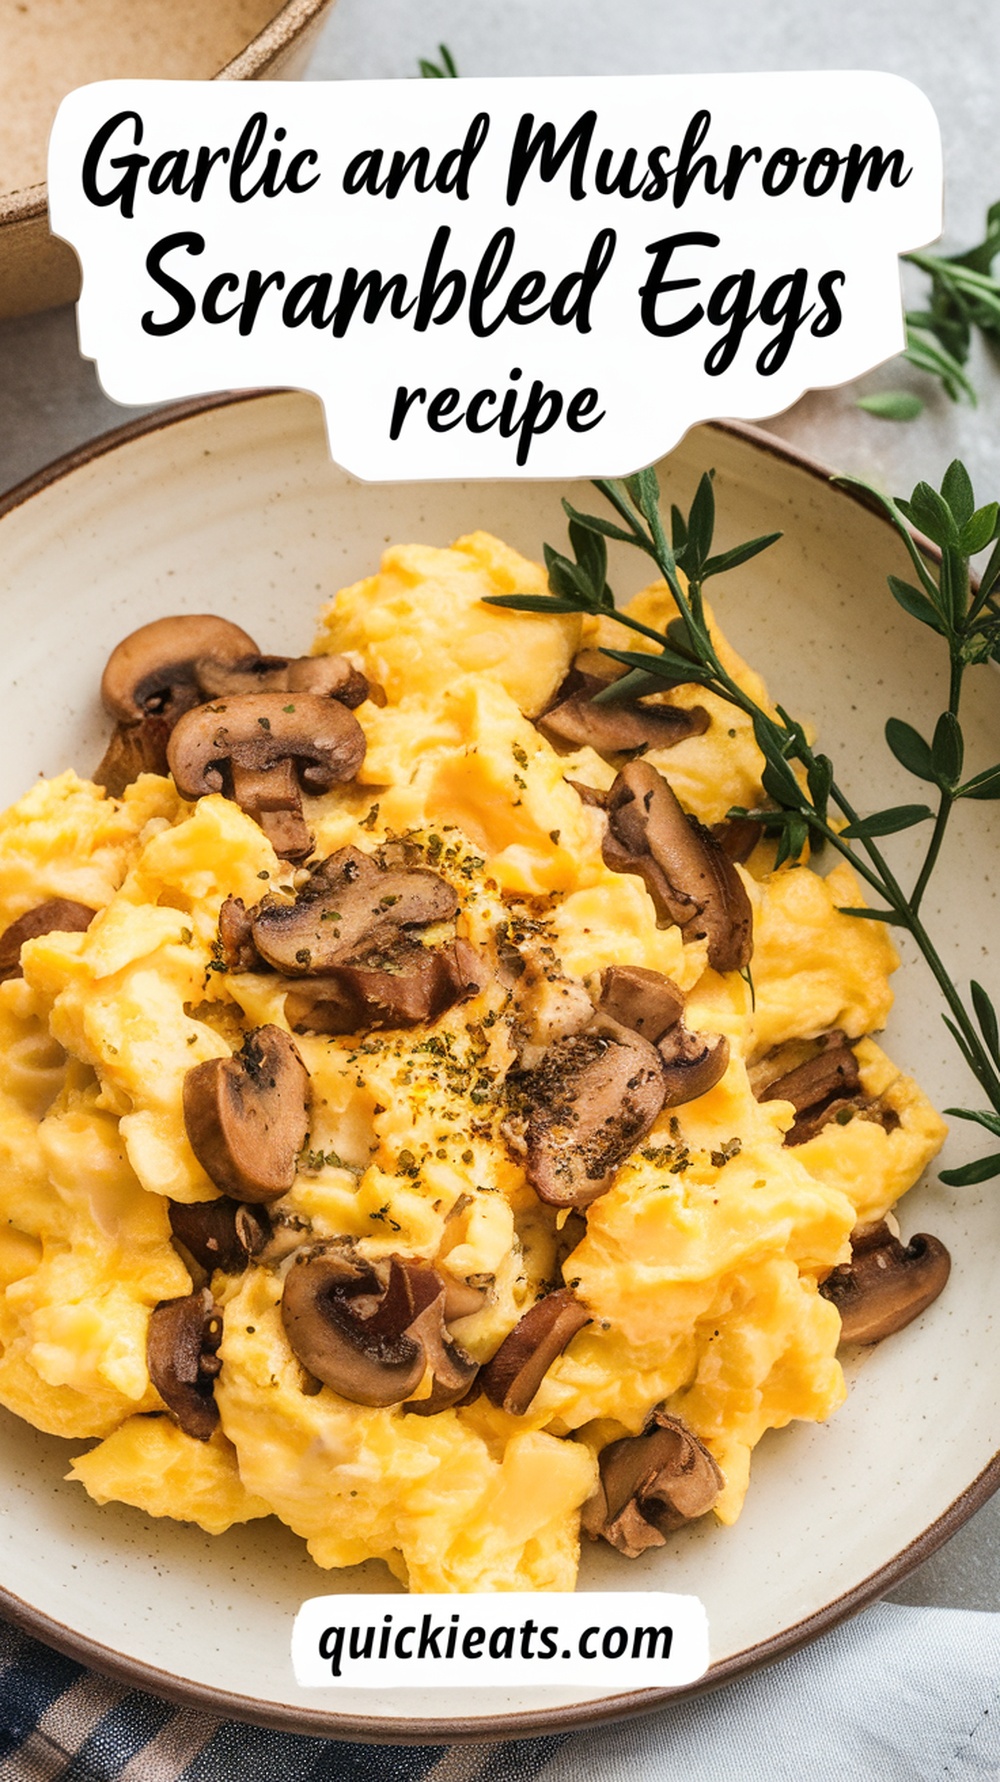
Want to make your morning extra special? These garlic and mushroom scrambled eggs might become your new favorite breakfast. The savory aroma of sautéed garlic mixed with earthy mushrooms will fill your kitchen and instantly wake up your senses. Think fluffy, creamy eggs meeting golden-brown mushrooms – it’s pure breakfast magic!
This dish feels fancy but couldn’t be simpler to whip up. The combination just works: tender mushrooms add a wonderful meatiness, while garlic brings that irresistible punch of flavor that makes everything better. You don’t need any special cooking skills to create something that tastes this good.
Perfect for lazy weekend mornings or when you want to treat yourself to something a bit more special than plain scrambled eggs. And the best part? It’s just as delicious for lunch or dinner when you’re craving breakfast food at odd hours.
Recipe Overview
| Prep Time | 10 minutes |
| Cook Time | 8 minutes |
| Total Time | 18 minutes |
| Servings | 2 servings |
| Cuisine | International |
| Dietary Information | Gluten-free, Low-carb, Vegetarian |
This savory breakfast dish combines fluffy scrambled eggs with sautéed mushrooms and aromatic garlic.
The preparation involves 10 minutes of washing and chopping mushrooms, mincing garlic, and beating eggs.
The cooking process takes 8 minutes, split between sautéing the mushrooms and garlic (5 minutes) and scrambling the eggs (3 minutes).
The recipe yields two generous servings, making it ideal for a hearty breakfast or light lunch.
While the dish has roots in various international cuisines, it incorporates common ingredients and techniques used worldwide.
It naturally fits multiple dietary preferences, being gluten-free and low-carb, while suitable for vegetarians who consume eggs.
Each serving provides a protein-rich meal with minimal carbohydrates.
Why We Love This Recipe
This garlic and mushroom scrambled eggs recipe takes a breakfast classic to new heights with savory, umami-rich ingredients. The earthiness of sautéed mushrooms paired with fragrant garlic creates a restaurant-worthy dish that’s surprisingly easy to make at home.
Each forkful delivers perfectly fluffy eggs enveloped in a medley of golden-brown mushrooms and aromatic garlic.
Beyond its incredible flavor, this recipe transforms basic scrambled eggs into a satisfying meal that works for breakfast, brunch, or breakfast-for-dinner. It’s ready in just 15 minutes, using simple ingredients most people already have in their kitchen.
The mushrooms add a meaty texture and boost the protein content, making it filling enough to power you through the morning.
For beginners and experienced cooks alike, this recipe is nearly foolproof while delivering impressive results.
It’s endlessly customizable – swap in different mushroom varieties or add fresh herbs to make it your own.
Whether served on toasted sourdough or alongside crispy hash browns, these garlic and mushroom scrambled eggs elevate the ordinary into something special.
Ingredients
Before diving into this savory breakfast dish, gather all your ingredients and equipment. Having everything measured and ready will help you create perfectly scrambled eggs with a delicious garlic-mushroom flavor.
- 4 large eggs
- 2 tablespoons butter, divided
- 8 ounces fresh mushrooms, sliced
- 3 cloves garlic, minced
- 1/4 cup milk
- 1/2 teaspoon salt
- 1/4 teaspoon black pepper
- 2 tablespoons fresh parsley, chopped
- 1/4 teaspoon dried thyme (optional)
For best results, use room temperature eggs and fresh mushrooms rather than canned ones. Baby bella or white button mushrooms work equally well in this recipe. If your garlic cloves are particularly large, reduce to 2 cloves to avoid overpowering the eggs. The moisture content of mushrooms can vary, so adjust cooking time as needed until they’re properly browned.
Cooking Instructions
Step 1. Sauté Minced Garlic
Once your pan is adequately heated, add a small amount of olive oil or butter and let it warm for about 30 seconds. You’ll know it’s ready when the oil shimmers slightly or the butter stops foaming.
Add 2-3 cloves of minced garlic to the pan, spreading it evenly across the surface. You’ll want to keep the heat at medium-low to prevent burning, as garlic can quickly turn bitter when overcooked.
Watch the garlic closely as it begins to turn golden – this should take about 45-60 seconds. Give it a gentle stir with your wooden spoon or spatula to ascertain even cooking. The aroma will become noticeably stronger when it’s ready!
Keep the garlic moving in the pan to prevent any pieces from sticking or burning. You’re looking for a light golden color, not brown. Once you see this color developing and smell that wonderful garlic fragrance, it’s time to move on to the next step.
If you notice the garlic cooking too quickly, don’t hesitate to lower the heat or temporarily move the pan off the burner. Perfect garlic is worth the extra attention!
Step 2. Cook Sliced Mushrooms
Adding the sliced mushrooms to your garlic-infused pan is your next step. Spread them evenly across the surface, making sure they’re not overcrowded. You want each slice to have direct contact with the hot pan for proper browning.
Keep the heat at medium and let those mushrooms cook undisturbed for about 3 minutes. You’ll notice they’ll start to release their natural moisture and shrink slightly. This is exactly what you want!
Once you see golden-brown edges forming, give them a quick stir. Continue cooking for another 2-3 minutes, stirring occasionally. The mushrooms should reduce in volume by about half and develop a rich, golden-brown color.
Season with a pinch of salt and black pepper – about 1/4 teaspoon of each. The salt will help draw out any remaining moisture, creating that perfect meaty texture mushroom lovers crave.
Your mushrooms are ready when they’re uniformly golden-brown and have a slightly firm bite. They should look glossy but not wet, and the edges should be nicely caramelized. You’re now ready for the next step!
Step 3. Beat Eggs With Spices
While your mushrooms are developing their golden perfection, it’s time to prepare the star of the dish – the eggs.
Crack 4 large eggs into a medium mixing bowl and add 2 tablespoons of whole milk or heavy cream for extra richness.
Now’s when you’ll add your signature seasonings. Sprinkle in 1/4 teaspoon of salt, 1/8 teaspoon of black pepper, and 1/4 teaspoon of dried thyme. The thyme will complement those earthy mushrooms beautifully!
Using a fork or whisk, beat the eggs with a steady motion until the yolks and whites are fully combined. You’ll know you’re done when the mixture is a uniform yellow color and slightly frothy on top. Don’t overbeat – about 30 seconds should do it.
For the fluffiest results, make sure your eggs are at room temperature before beating. If they’re cold from the fridge, let them sit out for about 15 minutes first.
While you wait, you can prep your other ingredients or check on those sizzling mushrooms.
Keep your egg mixture close to the stove – you’ll need it soon for the final cooking stage.
Step 4. Add Eggs to Pan
With the pan still medium-hot from cooking mushrooms, pour your beaten egg mixture directly into the center.
Let the eggs spread naturally across the pan, covering the mushrooms and garlic you’ve already cooked.
Wait about 30 seconds as the edges start to set. Using a silicone or rubber spatula, gently push the eggs from the outer edges toward the center of the pan, tilting it to let the raw egg flow into the empty spaces.
Continue this pushing and tilting motion every 20-30 seconds.
You’ll notice the eggs beginning to form soft, custard-like curds. Don’t rush this process – it’ll take about 2-3 minutes total.
When the eggs are about 80% set but still look slightly wet on top, remove the pan from heat.
They’ll continue cooking from the residual heat, so don’t wait until they’re completely firm.
Give everything one final, gentle fold to combine the mushrooms evenly with the eggs.
Your eggs should be creamy and tender, not dry or rubbery.
The golden curds will naturally incorporate all those savory mushrooms and fragrant garlic you prepared earlier!
Step 5. Fold Eggs Gently Until Set
Your scrambled eggs are now entering their final cooking phase, where gentle folding becomes essential for achieving the perfect texture. Using your spatula, push the edges toward the center of the pan while tilting it to allow the uncooked egg to flow to the sides.
Continue this folding motion every 20-30 seconds, letting the eggs slowly set. You’ll notice the mixture becoming less glossy and more structured as it cooks.
Don’t rush this process – it should take about 2-3 minutes total.
When the eggs are about 80% set but still look slightly wet on top, fold them over one final time. They’ll continue cooking from residual heat, so it’s better to remove them from the heat while they’re still a bit loose. You don’t want dry, overcooked eggs!
Give the pan one last gentle shake to guarantee even cooking. Your eggs should be soft, fluffy, and slightly creamy – not dry or broken into tiny pieces.
Transfer them to your serving plate immediately to prevent overcooking from the pan’s heat.
Step 6. Season With Black Pepper
Fresh black pepper adds the perfect finishing touch to your creamy scrambled eggs. Once your eggs have reached that perfectly soft and fluffy consistency, it’s time to give them a final seasoning that’ll wake up your taste buds.
Take your pepper mill and hold it about 6 inches above the eggs. Give it 4-5 good turns to evenly distribute the fresh pepper across the entire surface. You’ll want to see small black specks dotting the golden eggs.
If you don’t have a pepper mill, that’s okay – use about 1/4 teaspoon of pre-ground black pepper instead. Just remember that fresh-cracked pepper packs more flavor and aroma than the pre-ground variety.
Give the eggs one final gentle fold to incorporate the pepper throughout. You’ll notice how the peppery kick enhances the earthy mushrooms and aromatic garlic you’ve already cooked into the eggs.
Don’t be shy with the pepper – these eggs can handle it! The savory depth it adds creates the perfect balance with the creamy eggs and satisfying mushrooms.
Your breakfast is now ready to serve.
Step 7. Sprinkle Fresh Herbs Atop
Adding fresh herbs elevates these scrambled eggs from a simple breakfast to a gourmet experience. For this finishing touch, you’ll want to choose herbs that complement the earthy mushrooms and aromatic garlic you’ve already incorporated.
Grab about 1 tablespoon of fresh chives and finely chop them with a sharp knife. You can also add 1 teaspoon of chopped fresh parsley if you’d like to mix things up.
While your eggs are still hot and right after you’ve removed them from the heat, sprinkle the herbs evenly across the top. Don’t stir them in – letting them rest on top creates a beautiful presentation and allows their flavors to shine!
For an extra burst of freshness, you can add a small pinch of fresh thyme leaves. They’ll release their aroma from the warmth of the eggs, making your dish even more inviting.
If you’re meal prepping, wait until just before serving to add the herbs. Fresh herbs are always best when they haven’t been heated, and they’ll keep their bright color and robust flavor this way.
Tips and Variations
You’ll find that fresh thyme and rosemary are perfect herb companions for this garlic-mushroom combo, while a pinch of red pepper flakes adds unexpected warmth.
If you’re meal prepping, you can sauté the mushrooms and garlic ahead of time and store them in an airtight container for up to 2 days before combining with fresh eggs.
For variety, try swapping the button mushrooms with cremini, shiitake, or oyster mushrooms – each brings its own unique texture and depth of flavor to the dish.
Herb and Spice Pairings
Along with garlic and mushrooms, several herbs and spices can elevate your scrambled eggs to the next level. Fresh thyme is a natural companion that brings out the mushrooms’ earthiness, while a pinch of dried oregano adds a Mediterranean touch. Just 1/4 teaspoon of each is enough to enhance without overpowering.
For a French twist, add 1/2 teaspoon of finely chopped fresh tarragon and a light dusting of white pepper. You’ll love how the tarragon’s subtle licorice notes complement the eggs’ richness.
Red pepper flakes (1/8 teaspoon) can add a welcome kick, while fresh chives (1 tablespoon, chopped) provide a mild onion flavor and beautiful green color. Don’t forget about classic black pepper – freshly cracked is always best!
Consider mixing in 1/4 teaspoon of smoked paprika for a deep, smoky element that works beautifully with the mushrooms. For an Asian-inspired variation, try adding a small pinch of ground ginger and a dash of toasted sesame seeds right before serving.
Remember to add dried herbs early in the cooking process, but save fresh herbs for the final minute to preserve their flavor and color.
Make-Ahead Storage Tips
While fresh herbs enhance your scrambled eggs right away, planning ahead can save you precious morning time. You can prep your garlic and mushroom mixture up to 2 days in advance – just store it in an airtight container in the fridge.
To prep ahead, slice 8 ounces of mushrooms and mince 3 cloves of garlic. Sauté them together in butter until the mushrooms release their moisture and turn golden brown. Let the mixture cool completely before storing.
Don’t pre-scramble your eggs – they’re best when beaten fresh. Instead, focus on having your add-ins ready to go. You can even portion out your pre-cooked mushroom mixture into single servings for quick assembly.
If you’ve chopped extra herbs, store them properly to extend their life. Wrap them in slightly damp paper towels, place them in a zip-top bag, and squeeze out the excess air. They’ll stay fresh in your fridge’s crisper drawer for up to 5 days.
Remember to bring refrigerated ingredients to room temperature before cooking. This helps them incorporate more evenly and prevents your eggs from cooking unevenly!
Alternative Mushroom Choices
Mushroom lovers can elevate their scrambled eggs with several delicious alternatives to basic button mushrooms. You’ll find that each variety brings its own unique flavor profile and texture to your breakfast creation.
Baby portobello mushrooms offer a rich, meaty taste that’s perfect if you’re craving something substantial. Simply slice them into 1/4-inch pieces and sauté until golden brown for the best results.
Try shiitake mushrooms for an intense, woodsy flavor that pairs wonderfully with garlic. Remove the tough stems and cut the caps into thin strips – you’ll only need about 4-5 medium shiitakes per serving.
Oyster mushrooms provide a delicate, seafood-like taste and tender texture. Tear them into bite-sized pieces by hand rather than using a knife for the most appealing presentation.
For a truly luxurious twist, try porcini mushrooms! While dried porcinis are more common, fresh ones can be sliced thinly and will infuse your eggs with an incredible earthy aroma.
Just remember that these premium mushrooms are more expensive, so use them sparingly – about 1-2 ounces per serving.
Storage Suggestions
Leftover garlic and mushroom scrambled eggs can be stored in an airtight container in the refrigerator for up to 2 days. For best results, let the eggs cool completely before transferring them to your storage container to prevent excess moisture from forming.
If you’re meal prepping, you can portion the scrambled eggs into individual servings using separate containers. This makes it easy to grab and go when you’re ready to eat! Make sure to label each container with the date so you can track freshness.
To reheat your eggs, you’ve got options. Microwave them in 30-second intervals, stirring between each round until they reach 165°F. You can also reheat them in a non-stick pan over medium-low heat for 2-3 minutes, adding a splash of water to keep them moist.
Don’t freeze your scrambled eggs – they’ll become watery and rubbery when thawed. Instead, it’s best to make fresh batches when needed.
If you’ve added extra toppings like cheese or herbs, they might affect storage time, so use your best judgment and always check for any off-putting odors before eating.
Serving Suggestions
For a complete breakfast experience, pair your garlic and mushroom scrambled eggs with toasted sourdough bread or crispy hash browns. A sprinkle of fresh chives or parsley adds a pop of color and fresh flavor to your plate.
You’ll love how versatile these eggs are! Serve them as part of a hearty brunch spread or a quick weekday breakfast. For extra protein, add a side of crispy bacon or turkey sausage links.
| Main Accompaniments | Fresh Toppings |
|---|---|
| Sourdough Toast | Fresh Chives |
| Hash Browns | Parsley |
| English Muffins | Green Onions |
| Bagels | Microgreens |
| Croissants | Cherry Tomatoes |
Don’t forget to warm your plates before serving – it’ll keep your eggs at the perfect temperature longer. If you’re serving a crowd, place the eggs in a warm serving dish and let everyone help themselves.
For a café-style presentation, stack your toast diagonally and place the eggs off-center. Add a small side salad of mixed greens dressed with olive oil for a complete meal that’s both satisfying and Instagram-worthy.
Conclusion
Congratulations on creating a breakfast masterpiece that brings restaurant-quality flavors right to your table! The marriage of earthy mushrooms and aromatic garlic transforms ordinary scrambled eggs into an elevated morning experience.
This quick and satisfying dish proves that exceptional cooking doesn’t require hours in the kitchen. Each bite delivers a perfect balance of textures and flavors, making it an impressive addition to your culinary repertoire.
Start your day with confidence knowing you can whip up this wonderful combination of ingredients any time. Your breakfast game just reached new heights – time to savor every delicious moment.